|
Finally, some FTP help for the rest of us!
Now
that you've built your web page, your ready to
upload your HTML files to your web host. You are
ready for the world to see all your hard work!
Uploading can be a confusing process for some, but
hopefully after you read through this section,
you'll see it's quite easy. With that being said -
let's get started!
What
exactly is uploading?
Uploading
is the process of transferring files from one
computer to another, most often a larger computer
system that is set-up to receive files. OR you can
look at it this way, it's the opposite of
downloading (which I'm sure everyone has done by
now!) which is to receive files from another
computer (again usually a larger computer system)
to your own.
How
do I know what to upload?
You
will upload all HTML files, all graphics such as a
background gif, buttons, animated gifs, pictures,
banners, sound files - in other words everything
that makes up your web page!
Where
do I upload to?
Your
web host - whoever it may be! Your web host
provides the space for your files to reside on, be
it your ISP (Internet Service Provider) such as
AOL, Mindspring, Prodigy, etc. Or it could be a
separate web host such as Angelfire, Xoom,
Geocities - you get the picture. After you sign up
with the host of your choice, you then upload all
your web page files to your assigned space and
then link to these files on your web page. It's as
simple as that.
How
often do I upload?
Each
and every time you update your website - that is
if you want everyone else to see your updates.
Decide to change the font style? Edit your web
page, then upload. Time to change your background
color? Edit - Upload. Suddenly come to your senses
on that high school pic you have on your website?
Edit (quickly!) - then UPLOAD! It's a never ending
process - that's why it's so important to
completely understand HOW TO UPLOAD YOUR WEBPAGE.
How
do I upload my web page?
The
most common way to upload is by using a uploading
utility such as FTPDummy! or Uploader!. After
downloading an FTP program, you will need to
connect to your web host so that you can transfer
your files. Once you open the program, you will
click on SETTINGS so that you can enter your
website information including your FTP Site
address, username, and password. Let's go step by
step through each screen:
1.
FTP SITE ADDRESS - Most of the time this Address
is ftp.yourhost.com. For example if you were
uploading to Angelfire, you would enter
ftp.angelfire.com. OR if you have your own domain,
usually you enter your domain name here, such as
www.dummysoftware.com. OR you might enter your
assigned IP Address which will look something like
this: 123.321.123.321 - in other words a series of
numbers. Remember, get this information from your
web host - it's very important!
3.
USER ID - When you sign up with your web host,
you are usually asked to pick a User ID and
password. So unless instructed otherwise, enter
your User ID here.
4.
PASSWORD - In case you haven't guessed yet -
enter your password here. Be sure to check the
"Save Password" box so you won't have to
do this again!
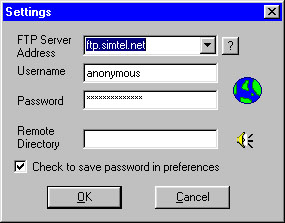
You will end up
with a screen like the one above.
Now click
"OK" - your information (hopefully) is
correct and your all set to connect to your host.
Now click CONNECT on the main screen to connect.
You should see a small window pop up as it
connects to your account.
If it won't
connect, don't despair. - Check and double check
your uploading information that you've entered. -
Read over the FAQ section on your web host
website. - Write to the tech support email address
supplied by your web host.
If you were
successful in connecting - you've just crossed the
biggest hurdle of all. Congrats! You won't have to
go through that again.
Now that you've
connected - you will see the files on your web
hosting account (if you are using FTPDummy!).
To choose files
to send, click on UPLOAD and find the files on
your computer that you want to send over to your
web host. You may need to follow your web host
instructions on exactly where to place your
website (in that case, just double-click on the
folder icons until you have moved into the proper
folder to upload), it varies from host to host.
However, usually you can just hit upload and it
will work fine.
But a tip on
where to place it is when you see index.html, you
are in the right directory. index.html is usually
the default or main file of your web page.
Sometimes it's index.htm or it may be default.html.
Back to the
uploading - after you've just clicked UPLOAD, now
highlight the files you want to send (that are
part of your web page), and click OPEN or OK. You
will then see a progress meter or file queue as
your files are transferred over. Continue doing
this with the rest of your web page files. Let's
say your main HTML file is named simple.html, you
will now want to rename that index.html and upload
over the index.html file that is currently there.
To rename a file, highlight the file on the web
host display, right-click on it and click the
Rename menu item in the small menu that pops up. A
small box will come up asking you for the new file
name.
Is that all
there is to it?
Yes - it's that
easy! Now type in the url of your web page and
take a look! Hopefully you uploaded everything and
your web page is there for everyone to see. Now
when you edit or add to your web page, you will
need to upload only the edited HTML file. If you
add new graphics to your web page, be sure to
upload those as well.
Are there
other ways to upload?
Some web hosts
allow you to upload directly from their website -
usually they have some sort of File Manager. You
end up doing the same thing, transferring files
from your computer to your web host. All offer you
instructions on how to upload using the file
manager, just take it one step at a time.
I hope this
section on uploading has helped you in some way.
It's a very important step in successfully
managing your website because you will do it again
. . and again . . and yet again!
Good luck to all
of you with your websites and happy uploading.
FTP Tutorial and
Help October, 2000 | 