
Settings
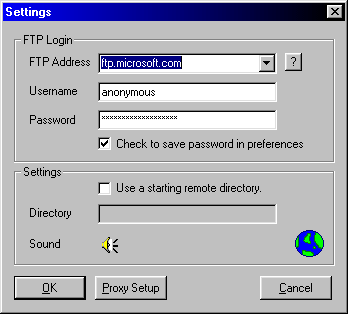 To new users, filling in the FTP Server Address is the most difficult part. Please refer to
What is My FTP Address if you are unsure what this field should be.
Are you using a proxy server? If so, see Connecting using a Proxy Server.
In the FTP Address field, enter a full site name such as:
ftp.webjump.com
myhome.virtualave.net
dummysoftware.com
123.456.789
In the USERNAME and PASSWORD fields, enter your username
and password such as:
harry123
******
The Remote Directory field can usually be left blank. If you intend, upon connecting, to start
in a specific directory, then enter a directory name such as:
public_html
public_html/
public_html/images
public_html/images/
Note for Unix accounts, you should enter a tilde ~ character for your remote directory. The
~ tilde character represents your home directory in Unix ftp accounts. For more information,
see Connecting to a Unix Account.
Clicking on SAVE PASSWORD IN PREFERENCES indicates whether you want the password
stored in the preference file in an encrypted form (along with the other fields you entered). This is
so that each time you run the program, the fields are remembered and filled in for you. Some people
wouldn't want the password stored in a file for security reasons.
Once you're satisfied with the entry, click OK to save it.
Proxy Settings
To new users, filling in the FTP Server Address is the most difficult part. Please refer to
What is My FTP Address if you are unsure what this field should be.
Are you using a proxy server? If so, see Connecting using a Proxy Server.
In the FTP Address field, enter a full site name such as:
ftp.webjump.com
myhome.virtualave.net
dummysoftware.com
123.456.789
In the USERNAME and PASSWORD fields, enter your username
and password such as:
harry123
******
The Remote Directory field can usually be left blank. If you intend, upon connecting, to start
in a specific directory, then enter a directory name such as:
public_html
public_html/
public_html/images
public_html/images/
Note for Unix accounts, you should enter a tilde ~ character for your remote directory. The
~ tilde character represents your home directory in Unix ftp accounts. For more information,
see Connecting to a Unix Account.
Clicking on SAVE PASSWORD IN PREFERENCES indicates whether you want the password
stored in the preference file in an encrypted form (along with the other fields you entered). This is
so that each time you run the program, the fields are remembered and filled in for you. Some people
wouldn't want the password stored in a file for security reasons.
Once you're satisfied with the entry, click OK to save it.
Proxy Settings
Note, Proxy Server Address should be in the form:
ipaddress:port#
127.0.0.1:8088

Where the first part is your proxy server address, followed by a : colon, followed by the port number.

What is My FTP Address?
 Determining your FTP Address is the biggest question for new users to FTP and publishing files
on the world wide web. Here are some solutions to getting your FTP Address and connecting:
1. Make sure you are connected to the Internet. Run FTPDummy!
2. Click SETTINGS. Now verify the FTP Address to which you are connecting. If you are not sure
that this is the correct host address, you will need to contact your ISP/Web Hosting Service for
the proper FTP host address to use. If they give you an address like: ftp://ftp.here.com, leave off
the ftp:// part of the address. The final form of your address should look like: ftp.here.com
Also note that your FTP Server Address is not your web address. It should not look like
http://www.somewhere.com. This is used by your web browser, not an ftp client.
3. Verify that you are using the correct User ID. Again if you are not sure, please contact your
ISP/Web Hosting Service for the correct User ID.
4. Verify that you are using the correct password. Re-enter the password. You may be entering a
wrong letter or number in this field. Also make sure you enter any capital letters appropriately
as they do make a difference. If it will still not connect, verify the password with your ISP/Web
Hosting Service.
The reason you need to verify the information with your ISP/Web Hosting Service is because they
supply you this information, and their computers have to verify and accept this information.
FTPDummy! only sends your ISP/Web Hosting Service the information you type in.
I Still Can't Find My FTP Address!
If you have already read over the What is My FTP Address section and still can not connect there is
only one thing you can do:
You need to contact your ISP/Web Hosting Service via the web or email and ask them to send your
FTP Connection information. This includes the FTP Server Address, your username, and your password.
They validate this information to let you connect and send your files. FTPDummy! only sends your information
to them. Since an FTP Server Address is like a house's street address, if you enter it incorrectly,
FTPDummy! can not locate your correct server.
Your ISP/Web Hosting Service should be able to quickly solve this problem for you. If you would like even
further information on the basics of connecting and getting your web site online, try reading the Beginner FTP Tutorial.
Connecting to AT&T Worldnet
You should always contact your ISP/Web Hosting Service to be sure you have the correct FTP Address
information. Generally, AT&T uses the following settings:
FTP Server Address: upload.att.net
Username: Your AT&T username
Password: Your e-mail password
If you have any problem with this, please double-check this information with AT&T.
Connecting to an AOL ftp site
To connect to an AOL site follow these 2 easy steps:
1) In FTPDummy!, Click SETTINGS.
2) FTP Server Address: members.aol.com
Username: anonymous
Password: your_user_name@aol.com
Remote Directory: <this should be left blank>
Make sure you are connected to the Internet through AOL.In order to connect to FTP through
AOL, they require you to already be connected to AOL.
FTPDummy! Features
File Previewing
Simply highlight a file to preview it right on the ftp server. Files that can be previewed include images,
Word documents, resumes, web pages, and more.
Online Editing
You can now edit files directly on the ftp server. Simply highlight the file, and click the edit button to
open the editor on your computer and begin modifying the file. When you're done, just save it locally,
close the editor, and FTPDummy! will publish the changes back to the server.
Offline Browsing and Cache
FTPDummy! comes packed with automatic caching. This allows you to browse ftp sites while not
connected to the internet and speed up your browsing while you are connected. It stores images
of the remote directories to quickly show them to you instead of reloading them.
Drag & Drop Files/Folders
Now you can drag and drop any file or entire folder to the FTPDummy! window and have your files
sent to your site.
Automatic Upgrade
Registered users get an automatic upgrade control which lets you detect new releases of FTPDummy!
and download them immediately.
Uploading
Uploading files to your Internet site is simple. Just drag and drop the file from your computer into
the FTPDummy! window that you have connected to. Uploading will then begin automatically.
You can drag and drop a list of files, or a single file. You can drag and drop an entire folder of files!
All sub-folders and files within that folder will also be uploaded. Any sub-folders will be created on
your Internet site if they do not already exist.
You can also click the UPLOAD button to initiate an upload, and then be asked to find the file you
wish to send and click OK. A shortcut to this button is hitting the INSERT button on your keyboard.
Determining your FTP Address is the biggest question for new users to FTP and publishing files
on the world wide web. Here are some solutions to getting your FTP Address and connecting:

1. Make sure you are connected to the Internet. Run FTPDummy!

2. Click SETTINGS. Now verify the FTP Address to which you are connecting. If you are not sure
    that this is the correct host address, you will need to contact your ISP/Web Hosting Service for
    the proper FTP host address to use. If they give you an address like: ftp://ftp.here.com, leave off
    the ftp:// part of the address. The final form of your address should look like: ftp.here.com

    Also note that your FTP Server Address is not your web address. It should not look like
    http://www.somewhere.com. This is used by your web browser, not an ftp client.

3. Verify that you are using the correct User ID. Again if you are not sure, please contact your
    ISP/Web Hosting Service for the correct User ID.

4. Verify that you are using the correct password. Re-enter the password. You may be entering a
    wrong letter or number in this field. Also make sure you enter any capital letters appropriately
    as they do make a difference. If it will still not connect, verify the password with your ISP/Web
    Hosting Service.

   The reason you need to verify the information with your ISP/Web Hosting Service is because they
   supply you this information, and their computers have to verify and accept this information.
   FTPDummy! only sends your ISP/Web Hosting Service the information you type in.


I Still Can't Find My FTP Address!


If you have already read over the What is My FTP Address section and still can not connect there is
only one thing you can do:

You need to contact your ISP/Web Hosting Service via the web or email and ask them to send your
FTP Connection information. This includes the FTP Server Address, your username, and your password.

They validate this information to let you connect and send your files. FTPDummy! only sends your information
to them. Since an FTP Server Address is like a house's street address, if you enter it incorrectly,
FTPDummy! can not locate your correct server.

Your ISP/Web Hosting Service should be able to quickly solve this problem for you. If you would like even
further information on the basics of connecting and getting your web site online, try reading the Beginner FTP Tutorial.

Connecting to AT&T Worldnet

You should always contact your ISP/Web Hosting Service to be sure you have the correct FTP Address
information. Generally, AT&T uses the following settings:

FTP Server Address: upload.att.net
Username:               Your AT&T username
Password:               Your e-mail password

If you have any problem with this, please double-check this information with AT&T.


 Connecting to an AOL ftp site

To connect to an AOL site follow these 2 easy steps:

1) In FTPDummy!, Click SETTINGS.
2) FTP Server Address: members.aol.com
  Username:               anonymous
    Password:               your_user_name@aol.com
    Remote Directory:    <this should be left blank>

Make sure you are connected to the Internet through AOL.In order to connect to FTP through
AOL, they require you to already be connected to AOL.


 FTPDummy! Features

File Previewing
Simply highlight a file to preview it right on the ftp server. Files that can be previewed include images,
Word documents, resumes, web pages, and more.

Online Editing
You can now edit files directly on the ftp server. Simply highlight the file, and click the edit button to
open the editor on your computer and begin modifying the file. When you're done, just save it locally,
close the editor, and FTPDummy! will publish the changes back to the server.

Offline Browsing and Cache
FTPDummy! comes packed with automatic caching. This allows you to browse ftp sites while not
connected to the internet and speed up your browsing while you are connected. It stores images
of the remote directories to quickly show them to you instead of reloading them.

Drag & Drop Files/Folders
Now you can drag and drop any file or entire folder to the FTPDummy! window and have your files
sent to your site.

Automatic Upgrade
Registered users get an automatic upgrade control which lets you detect new releases of FTPDummy!
and download them immediately.

Uploading

Uploading files to your Internet site is simple. Just drag and drop the file from your computer into
the FTPDummy! window that you have connected to. Uploading will then begin automatically.

You can drag and drop a list of files, or a single file. You can drag and drop an entire folder of files!
All sub-folders and files within that folder will also be uploaded. Any sub-folders will be created on
your Internet site if they do not already exist.

You can also click the UPLOAD button to initiate an upload, and then be asked to find the file you
wish to send and click OK. A shortcut to this button is hitting the INSERT button on your keyboard.
Uploading in ASCII format and CGI Scripts
By default, files are transferred in binary format. This is the preferred way to send most web files
including HTML web pages, graphics, and other files. Certain files though, must be sent in ASCII
format.
The most common files like this are CGI Scripts or Perl Scripts. These must be uploaded in ascii
format or they will not execute properly on the server. Uploading files in ascii format is simple using FTPDummy!.
First, any files with a .pl or .cgi extention will automatically be uploaded in ascii format. Or, to do it manually:

1. After you are connected, click the OPTIONS button.
2. Check-mark the "Transfer in ASCII format" box.
3. Click OK, and then send your files as you normally would by clicking SEND or dragging
    and dropping the files into the FTPDummy! window.
Downloading

Double-click on the file you want to download to begin downloading it. Note drag and drop for downloading
is not currently supported, you must actually double-click on the files you wish to get.

You can download multiple files by selecting them and clicking DOWNLOAD.
You can download a single file by double-clicking it.

Downloads are, by default, saved to your desktop. You can change this location by clicking local directory
and select the folder you wish downloads to go into.

Downloads can also be automatically ran after you finish downloading them. This is an option listed in the
options screen. Note the file will only be executed if it is a single file being downloaded. If you are downloading
more than 1 file at one time, it will not execute any of them. This is turned on by default in the beginning.


Removing

To remove a file, select the file in the window and click the remove button to delete it from your Internet
site. Note, once a file is erased, it can not be returned.

You can remove multiple files by selecting them and clicking remove.
You can remove a single file by selecting it and clicking remove.
You can remove a folder by selecting it and clicking remove. All files and sub-folders within that folder will
also be erased.

A shortcut to removing a file is by clicking the delete key on your keyboard.


Renaming

To  rename a file right-click on the file and select rename from the list that pops up.

You can also use the same method to rename files in the Windows operating system. Click once on
the file to select it, wait 1 second, then click again to begin the renaming process. Type in the new
filename and then hit enter to rename it.
Editing Files

By default, FTPDummy! opens all files for editing in Windows Notepad. This is the most basic editing
program used for making changes to web page files. If you prefer to use your computer's default editor,
then click OPTIONS and uncheck "Enable Notepad as default editor". Once unchecked,
all files will now be opened for editing using your system's default editor for the file type.

Follow these instructions to edit your files in FTPDummy!:
1. Select the file you wish to edit by clicking on it once to highlight it.
2. Click the EDIT button.
3. The file will open (by default in Notepad) where you may now make the desired changes.
4. Save the file by clicking FILE->SAVE and close the file.
5. Click YES to FTPDummy! saying you wish to save the file online, or NO to discard saving the file online.
Changing Folder Display Views

FTPDummy! has all the standard folder views for your Internet site as Windows does. These include
Detailed view, Large Icon view, Small Icon view, and List view.

You can switch between views by clicking the VIEWS button at the top left corner of the screen after
being connected.

The Detailed view will give you full descriptions and details of each file such as its file type, download
time, size, and more.

You can also get this same information in the other views by moving your mouse over a file and
holding it there for a few seconds to activate the "tooltip". A small window will pop up next to the file
displaying its details.


Changing File Permissions, CHMOD
Changing permissions or "chmod 755" a file allows a file to be executed on the server or makes it
public/private to certain people.

You will often want to change the permissions of CGI and Perl script files that need to execute on
your web server. Doing this is simple.
1. After you are connected, right-click on the file you want to change permissions on.
2. In the small sub-menu that pops up, select the menu item Change Permissions.
3. In the permissions window, enter the number for the permissions setting you desire.
    755 is public and executable, good for CGI and Perl scripts.
    777 is full public.
    000 is private.
    You may want to ask your web administrator the other file permissions if you have more advanced
    uses for this. In general, most people want to make the file executable, so using the setting 755
    (which is the default) is what you need.
4. Click OK, the file permissions are now changed.
Options/Quick-Browse Cache

Quick-browse cache allows you to not only browse files offline, but also speed up your online
browsing dramtically. It saves the list of files on your internet account and displays them in the
future instead of reloading the list from the server.

Enabling quick-browse memory will begin storing listings for the current session. If you click UP
to move to a previously visited directory, it will display it instantly from memory, instead of pulling it from
the internet again.

Enabling quick-browse between sessions allows you to keep the above abilities after you close the
connection and the next time you run the program too.

Note, when you use quick-browse memory, you are not viewing the most recent listing of files. Some files
may have actually changed on your internet site and you are only viewing a "snapshot" of the previously
visited listing. To refresh the memory and the display, simply click refresh. The memory tries to stay up
to date as best it can with smart features, but clicking refresh if you are unsure of the display list will always
make sure you see the most recent file listings.


The Address Book / Entering Multiple Sites

You can enter multiple sites by simply entering a new site name, user information, password
and click OK.

Selecting the Entries
To select the different sites, you can click on the pull-down button next to the SITE name field
and it will list all the ftp sites you have entered. Once you select a site, the username, password,
and other fields will fill in automatically to what you had them at before for that site. Any further
changes you make will be saved once you hit OK in the settings.

Adding a New Entry
If the site name field currently has something entered already (such as a previously selected ftp site),
just begin typing over it and enter all the new information and then click OK. This will enter a new site into
the preferences file as long as the site name is a new one.

Likewise, to change any fields on an already existing entry, just select the entry from the pulldown,
modify the fields such as the password, username, or directory, and then click OK. This will update the entry.

Removing an Entry
To remove an entry, select the entry to be removed. Then click the small 'X' button beside the FTP Server
Address. The entry will be removed from the database.
Why should I register? Purchasing.

FTPDummy! has a 14 day trial period. After that time period, it will expire and you can no longer
connect to FTP sites until you register. To register costs only $24.95.

The registration fee is modest compared to the power of this software. Click register on the main
screen of FTPDummy! to visit our purchase page.
Upon purchasing you will receive a registration code. In the software, click register, and enter that
code into the box supplied. Your code will then be validated on our servers for authentication and
your software will then be registered.
Why should you register?
1. Registering removes the 14-day trial period.
2. Registering allows for the automatic upgrade feature.
3. The register button will be replaced with an upgrade button which you can periodically check for new
    updates of FTPDummy!.
5. Registering removes any unregistered notices.
6. Registering gives you preferred customer support status.
 or 1-800-414-4268 or orders@bmtmicro.com
Register today by clicking here
Or register today by clicking the register button in the software.
Connecting to a UNIX account
To connect to a UNIX account follow these
important steps:
1. Enter your ftp address, username, and password as usual.
2. Enable the remote directory option.
3. Enter a tilde ~ for your remote directory.
This symbol is usually typed by holding SHIFT + Quotation
Mark key on your keyboard.
Just look at your keyboard to find the key to hit. The tilde
represents your home directory in Unix accounts.
Connecting using a Proxy Server
If you connect to the Internet through a proxy
server, follow these instructions for the settings of FTPDummy!.
1. Open the SETTINGS screen in FTPDummy!.
2. For FTP SERVER ADDRESS, enter your proxy server address.
3. For USERNAME, enter ftp_username@ftp_server_address
If you want to connect to ftp.microsoft.com using the
username anonymous,
you would enter the string anonymous@ftp.microsoft.com for
this field.
4. For PASSWORD, enter the password for the remote ftp site as your
normally would, no special changes.
Note, if you are using a WinProxy
compatible proxy server, then for step 3, follow as directed.
If you are using RideWay proxy server, step 3 should look like
ftp_username#ftp_server_address
with a pound sign # instead of the ampersand @.
Here is an example scenario connecting to ftp.microsoft.com
using the account johndoe with
the password bluehorse and assume you are running through a proxy server
that has the IP address
of 127.0.0.1.

Support
Feel free to contact us.
Web Address: http://www.dummysoftware.com/ftpdummy.html
Support:
Email Support
FTPDummy! is also available in the Internet Dummy Deluxe
Package!
Check it out: http://www.dummysoftware.com/dummydeluxe/main.html
